
Mode-S: a brief introduction
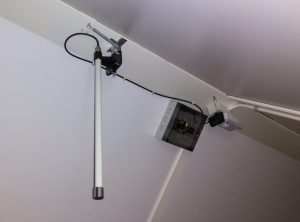
If you’re not aware what Mode-S is, then this whole post is probably of little use to you. Basically, Mode-S or ADS-B are automatic radio transmissions by aircraft with a lot of data about the aircraft’s position, altitude, heading, etcetera. It is of course intended for Air Traffic Control purposes, but some years ago a bunch of very smart people figured out how to receive and decode these signals for aviation enthusiasts use. This is how the virtual radars came into being, and it has changed “the game” for aircraft spotters quite a bit. We dreamed of owning a radar set in our younger days, now we in fact do, with just a computer and a Mode-S receiver. The latter can even be a very cheap one, again a bunch of very smart people figured out how to use a TV-receiver USB dongle for Mode-S, and these can be ordered with some patience from China for less that 10 Euros!
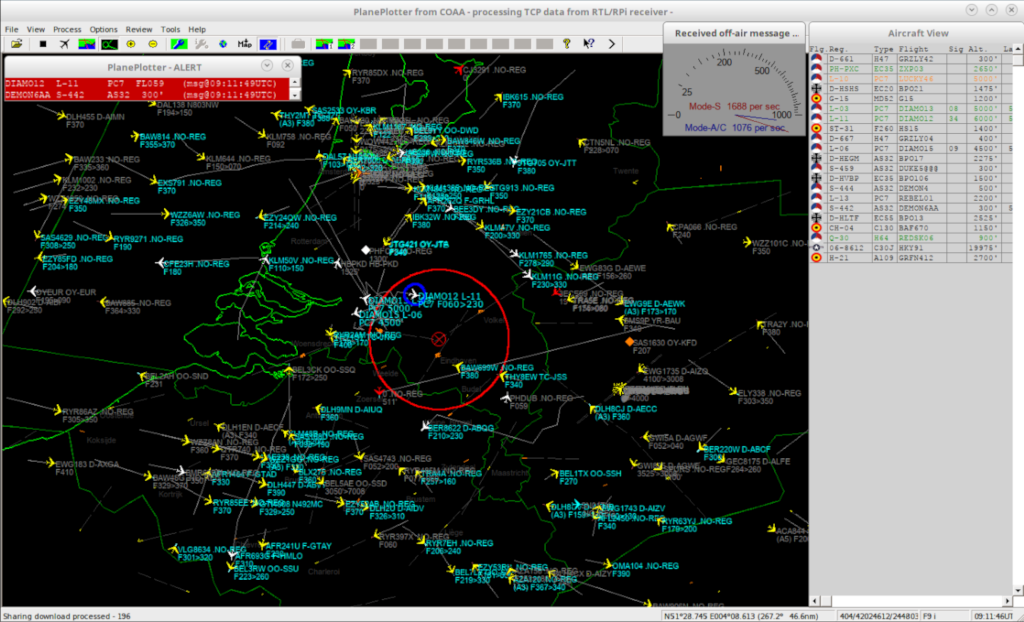
To visualize the signals, and those shared by others over the internet, I use PlanePlotter. Not the easiest piece of software to master, but it is very powerful and comes without censoring of “sensitive” traffic. It also pioneered MLAT’ing, where aircraft which do not disclose their position (like most military aircraft) can still be plotted with enough ground stations receiving the signal and combining these through the sharing system.
My Mode-S page
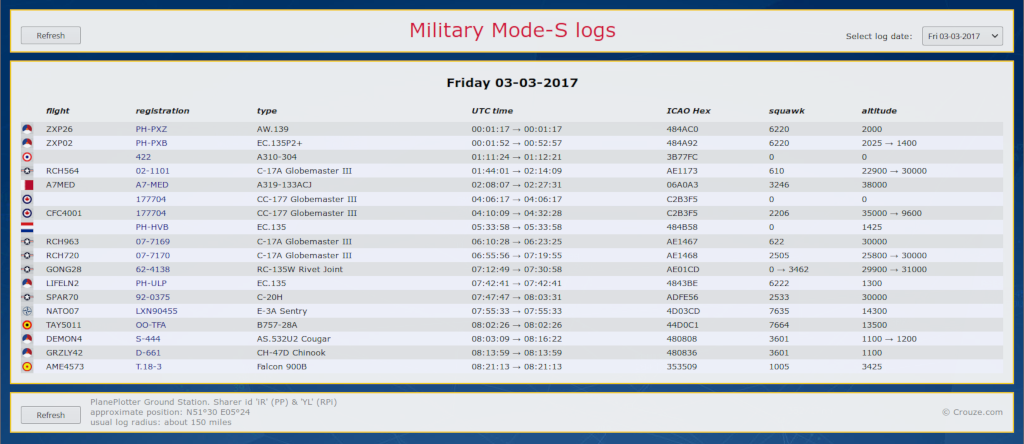
Once I had set up my Mode-S kit and started using it, I soon got the idea for a web page with a log of the day’s aircraft movements in my area. I’m fortunate to be living right under a corridor with a lot of AMC (US Air Force transport aircraft) traffic flying in and out of Germany, and such a page would help to keep track of movements. Not really for the benefit of anyone but myself, but I was soon surprised how useful others were about to find this page. I’m also quite sure a couple of “non spotting” individuals consult the page on a daily base…if you know what I mean…
“Wow, that’s cool! I want to have this too. Can I? How did you do it?” is a frequent reaction when people comment on my Military Mode-S logs page. Well, maybe you can. But it isn’t necessarily easy, and has quite a few prerequisites…
What follows is not a cookbook, nor will I set it up for you or learn you the basics of PlanePlotter, webservers, PHP scripts, and what more. This is just an explanation of how I set things up, it’s for you to figure out how it’s actually done. Trust me…it’s much more rewarding like that!
The prerequisites
So, should you be playing with the thought of setting up something similar, then what I’m about to say might not sound too hopeful. I don’t only own my internet domain, but host it myself as well. Which means I have full access to the servers, including the web server. If you host your website with a provider, then you might want to check what the possibilities are with these prerequisites:
- An up-and-running PlanePlotter installation, as an authenticated ground station, running 24/7, with your own receiver. I have virtualized my PlanePlotter computer as a virtual machine, and it’s Linux, with PlanePlotter on it with Wine. But that’s beside the point, a normal computer with Windows will do just as well. Don’t even start thinking about a web page like mine if you don’t already have PlanePlotter and at least are confident with the basics!
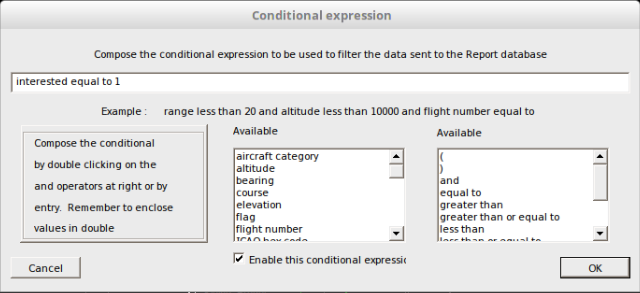
- You must have implemented a method in PlanePlotter to filter only the aircraft you’re interested in (and want to have displayed on your web page). There is a “interested” field in the basestation.sqb database file which needs to be set for all interested aircraft. This is used by a conditional expression in PlanePlotter. I have also appended the country description of all interested aircraft in my basestation.sqb file with “mil”.
- A set of flag or military “roundel” images, named after each country similar as in the basestation.sqb database.
- A web server to host the page on. I use Apache on a (again) virtualized Linux server, but it can just as well be IIS hosted by your provider. You must be able to upload scripts to it, and not just some “point-and-click” web page builder.
- The web server must support PHP, and PHP itself must support SQLite through PDO. Ask your hosting provider if unsure…
- The web server must have access to your PlanePlotter files. There is more than one way to achieve this, but more than a basic access to your web server will be needed. I use Dropbox for this, syncing the required files between the PlanePlotter computer and the web server.
- Adequate knowledge of HTML, CSS, PHP and (optionally) Python or Powershell.
- More things I haven’t thought off at this moment, likely…
I never said it would be easy. Still here? Okay, let’s continue…
And now…the setup
PlanePlotter, with its quirks and sometimes daunting menus, actually has a built-in logging functionality capable of generating the kind of logs we need. You just need to enable it. What we want is a log of all aircraft we’re interested in, received by our own antenna, over the course of a singe day. You could also log and display more, but that might become a silly thing to do very fast.
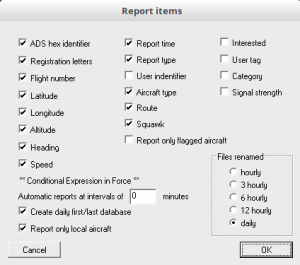
In the PlanePlotter menu, go to File → Report → Setup report format. Tick the boxes as shown here. Note the “Conditional Expression in Force” remark, which you can not set or switch off here but is set in the Options menu (Options → Conditional expressions → Report conditional expression, as in the screen shot). Furthermore we instruct PlanePlotter here to create a “daily first/last database”, to use only local aircraft (in other words only aircraft you have received yourself) and to create a new log file every day.
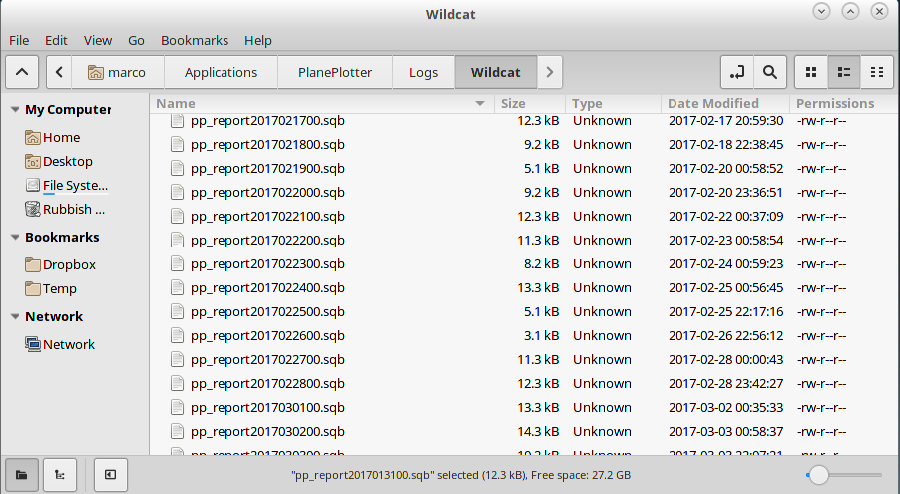
Now, these log files need to be readable by the PHP scripts on the web server. How you manage this…is up to you. As mentioned before, I do this with Dropbox on both PlanePlotter computer and the web server. To prevent the web server trying to open a log file just when Dropbox is syncing a new version of the file (which it does almost constantly) I don’t let Apache actually read directly from the Dropbox folder, but copy the content from Dropbox to Apache with a cron job (a scheduled task in Windows terms) every 10 minutes.
Still here? Good, it’s time to set up your web site in your web server. That’s completely up to you. The next part is to actually script with PHP, connecting the required log file (remember: it’s actually a SQLite database file) and parsing it to display the log in a decent format.